
Tech Education
- COOLING SYSTEM
- THERMOSTATS
- COOLANT CAPS
- FUEL CAPS
The cooling system removes excess heat to keep the inside of the engine at an efficient temperature, about 200° F (94° C).
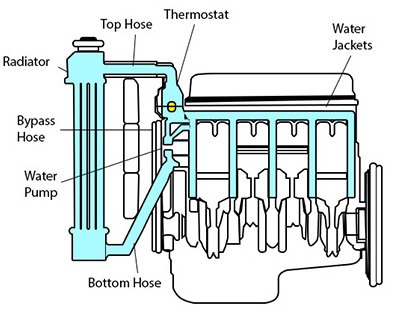
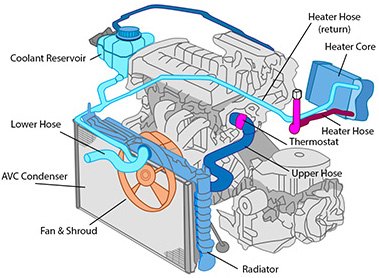
Coolant flows through the water jackets where it absorbs heat. It then flows through the radiator where heat is transferred to the air passing through. The amount of flow is determined by the water pump. The flow direction is controlled by the thermostat.

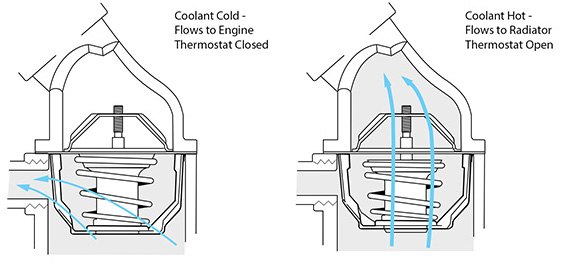
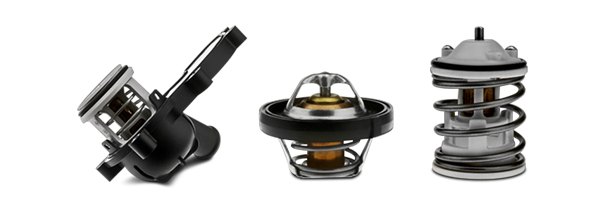
When an engine is cold, the thermostat is cold. Coolant flow is through the bypass hoes and the water jackets. This allows the engine to warm up evenly.
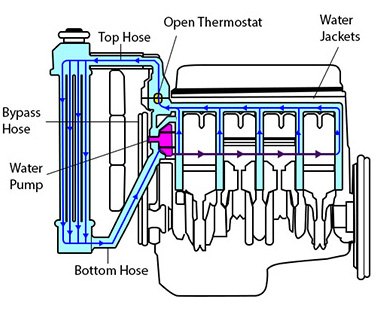
The thermostat opens when the engine warms up. This allows coolant to circulate through the radiator and the water jackets.
- Maintains operating temperature of approximately 200-235 degrees.
- When temperature is low, bypass blocks coolant flow through radiator.
- When correct temperature is reached, thermostat opens and excess heat is absorbed through water jackets and passed on to air flowing through radiator.
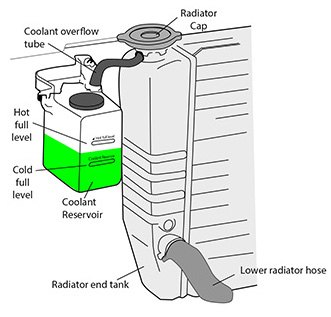
Reinforced rubber hoses transfer the coolant from the engine to the radiator, coolant reservoir, and heater core. The hot coolant flows through the radiator tubes and heat is transferred to the fins and then to the air passing through radiator.
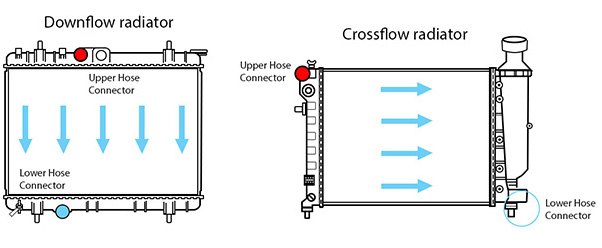
Older vehicles used down flow radiators with the coolant flowing from the top to the bottom. Modern vehicles use cross flow radiators with the coolant flowing from one side to the other.
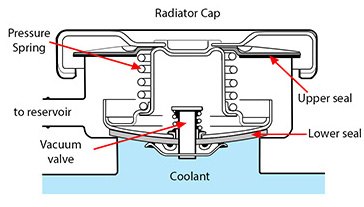
The upper gasket prevents coolant from escaping to the outside. The lower gasket keeps a pressure in the radiator. The cam lock pushes the two gaskets against the sealing surfaces when the cap is installed. The safety stop prevents the cap from being opened to quickly. Radiator pressure results from the expansion of the coolant as the engine warms up. Coolant volume increases about 10% as the temperature increases from 70 to 180° F (21-82° C). The radiator cap creates the pressure by holding the coolant in the radiator.
The coolants boiling point increases about 3° F for each psi increase in pressure. When the engine warms up, the radiator cap allows the expanding coolant to flow in to the coolant recovery reservoir. When the engine and coolant cool down, the coolant returns to the radiator and water jackets through the vacuum valve in the cap.
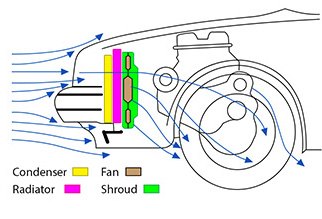
Air flows through the openings at the front of the vehicle, through the radiator and other heat exchangers, and exits past the engine. The fan with shroud assists the natural flow when the vehicle goes slow or is stopped.
Is there a possibility that a thermostat will not provide enough heat to the engine?: No! A thermostat starts to work only when the engine is hot, which means that the route for the cooling fluid (except for a specified amount of leakage) remains closed. There is no way that a thermostat will add heat to the engine, theoretically and practically, a thermostat prevents overheating of the engine even in the coldest of weather! This is a fact.
- Check if the heat control is set to the correct temperature.
- Check if the antifreeze level is correct in the radiator and reservoir tank. Always use good quality antifreeze and preferably distilled water.
- Check to make sure the hoses to and from the radiator are not clogged.
- Example: An engine size of 2.0L will reach the right temperature in cold weather -15° C approx. 10-12 minutes after the engine has been turned on or after 4-5 miles (5-7 km).
- Do not open the heater fan before the engine reaches the right temperature.
- The thermostat may be stuck open.
- Always use the recommended OEM thermostat temperature.
Overheating problems can occur from:
- Pure water in the cooling system with a pressure cap more than 4lbs.
- The coolant not being the right mixture 50% water and 50% ethylene glycol (antifreeze) or (anti boil).
- A faulty pressure cap (The rubber seals in the radiator caps become dry and develops fine hairline cracks due to heat and lower levels of coolant)
- A dirty radiator
- A defective water pump (no circulation in the system)
- Belts that drive the water pump are loose.
- When vehicle is on idle position, make sure to check the fan clutch/ electric fan motor are operating properly.
- A defective fan clutch/ electric fan motor.
- A defective thermoswitch.
The above are only some of the causes of overheating problems.
A proper thermostat is in the engine to control the heat which occurs from the combustion of the fuel, and it does not add heat to the engine. Overheating will cause damage to the engine and will also damage the thermostat (thermostat burned through) a thermostat itself cannot be the cause of overheating.
The thermostat can be tested by boiling it in plain water for approximately 3 to 5 minutes. If the thermostat does not open, then it must have been damaged (burned through) by the overheating caused by any of the above mentioned reasons.
Every engine must run in a specified temperature, an engine that runs cold (without a thermostat) will use between 10-20% more fuel and the engine will not run properly.
Don’t Just Replace the Thermostat!

A slowly failing, worn out or faulty radiator cap can result in overheating, loss of coolant or even major engine damage. One function of the radiator cap is to keep pressure on the cooling system. If the pressure on the system drops because of a failing radiator cap, the boiling point of the coolant also drops. If the boiling point drops enough, it can cause the engine to overheat.
If you replace a thermostat and the radiator cap is more than three years old, chances are is not holding to the same pressure as a new cap. Explain to your customer that by replacing the thermostat and the radiator cap, their vehicle should run within the specified operating temperature and the coolant system will be properly pressurized.
The radiator pressure cap is a very important component of the system. The cap monitors the pressure of the system and adjusts to maintain the desired pressure (normally in the 15 psi range). If an improper cap or a defective cap is used, the correct system pressure will not be maintained. If the system pressure is too low the coolant will be allowed to boil at unacceptable temperatures. If the system pressure is too high, damage to the system can occur, potentially causing loss of coolant and an engine overheating condition.
A system with the correct coolant ratio and proper pressure will inhibit a fluid boil. If fluid boils within the system, severe damage to the engine and components of the cooling system can occur in the form of cavitation and cavitation erosion. Long term effects of this phenomenon can be detrimental to the water pump seal, impeller, and pump casting along with other engine/system components in direct contact with the coolant leading to catastrophic failure.
In extreme operating conditions or on days with high ambient temperatures, the system pressure may reach pressures above design or desired levels. If the system pressure begins to exceed to maximum acceptable pressure, the pressure cap will release pressure to maintain the design system pressure. The reserve tank functions as a reservoir to capture coolant discharge during a release of pressure from the radiator pressure cap. This prevents the discharge coolant from entering the environment and captures it for replenishment of the system. As the fluid temperature and pressure in the system decreases a vacuum occurs that draws the previously discharged fluid volume in the Reserve Tank back into the system.
Step-Up to the Best of Both Worlds
Did You Know?
- MotoRad’s top selling locking fuel caps can be used in the locking or non-locking position.
- 30 gallons of fuel can be released annually through evaporation from a gas cap with a deteriorating seal.
To Install:
Insert cap and rotate until it “clicks” or comes to a stop. While holding the cap, insert the key and turn in to the right until it can be removed (1/2 turn).
To Remove:
Insert the key, while holding the cap, turn the key to the left until it can be removed (1/2 turn). Once key is removed, rotate cap to the left to remove. When the key is turned to the left and removed the cap is unlocked and no longer spins freely. The cap meets all emission specifications in both the locked for unlocked positions.
All of MotoRad’s Fuel Caps:
- Meet MVSS 301 fluid loss limitation and static rollover test procedures to determine vehicle fuel system integrity
- Will pass the I/M 240 emissions test
- Are manufactured per ISO 9000 practices
MotoRad fuel caps are designed and manufactured to prevent fuel loss, primarily through evaporation. A faulty or leaky fuel cap emit up-to 30 gallons of fuel per year in to the atmosphere. All of MotoRad’s fuel caps meet all Federal (MVSS301) and I/M 240 requirements.

Standard Fuel Caps
MotoRad standard fuel caps pass all state and federal emissions requirements. The caps are specifically designed with pressure and vacuum relief valves to prevent evaporation of fuel.
Locking Fuel Caps
MotoRad’s locking fuel caps can function as a locking or non-locking fuel cap. To install, insert cap and rotate right until it ‘clicks’ or comes to a stop. While holding the cap, insert the key and turn it to the right until the key can be removed (1/2 turn). The cap will spin freely when it is locked.
To remove, insert the key. While holding the cap, turn the key to the left until it can be removed (1/2 turn). Once the key is removed, rotate cap to the left to remove.
When the key is turned to the left and removed, the cap is unlocked and no longer spins freely. The cap meets all emission specifications in both the locked and unlocked position.