
- Installation
- Condensation
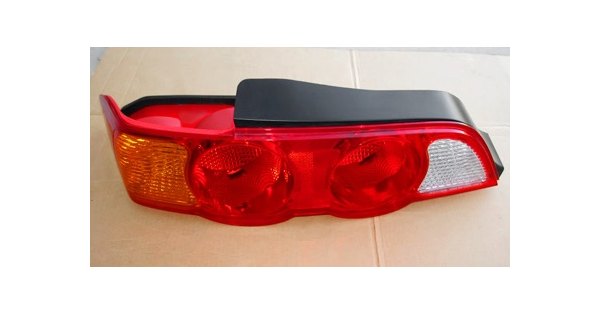
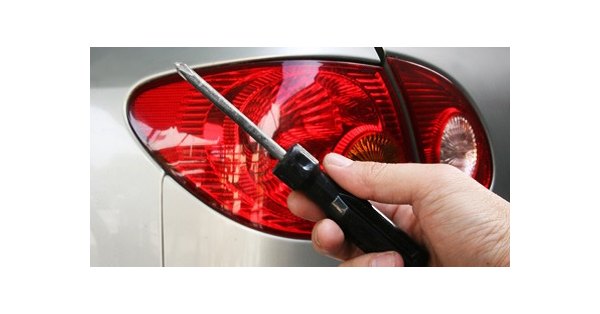
How To Install A Set Of Tail Lights
Professional installation is recommended, though if you're an experienced do-it-yourselfer, you would probably manage. Never forget about proper safety measures while installing this product and do not try to perform the task without necessary tools and factory service manual. As for the vehicle, it must be in a fixed and stable position before the installation process begins.
Tools required: phillips scredriver or socket wrench set, painters tape to avoid scratches, torque wrenches.
Inspect the new tail light assembly before you start the installation and make sure you'll be able to complete the process with the tools you have at hand.
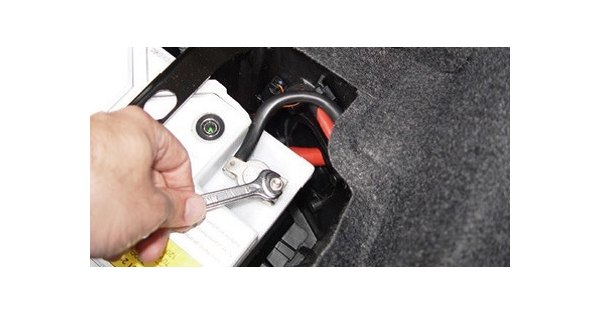
STEP 1. Disconnect your battery's negative battery terminal.
Be careful! Please note that some automobiles (such as newer GMs) have highly sensitive electrical systems. If such is the case, a failure to disconnect the battery before beginning installation may cause blown tail lamp fuses or other similar damages.
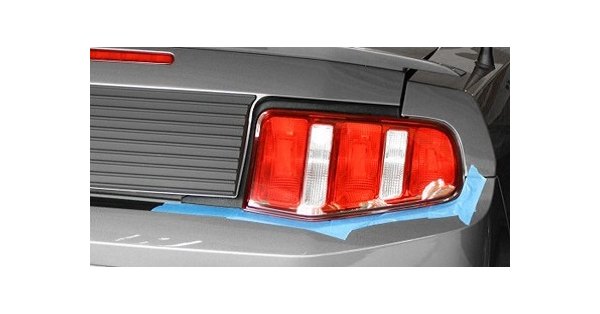
STEP 2. Apply painters tape around the edges of your tail lights to protect them from scratches that might occur during the installation.
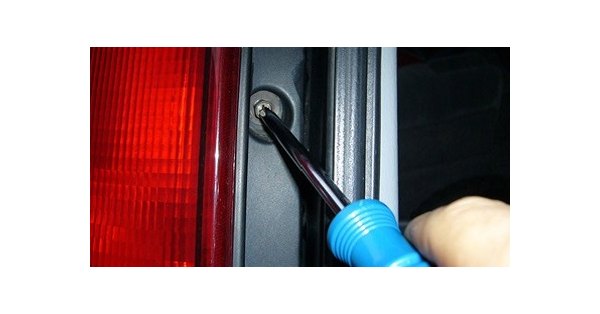
STEP 3. Unscrew your worn out tail lamps from the front with the help of a Phillips screwdriver or undo of the bolts is released, your old lights may fall instantly. For this reason, it is better to lightly keep the lights in place with your free hand while you unscrew or unbolt them.
NOTE! To carefully remove your stock lights, open your tailgate or trunk lid to access the back panel of your tail lights.
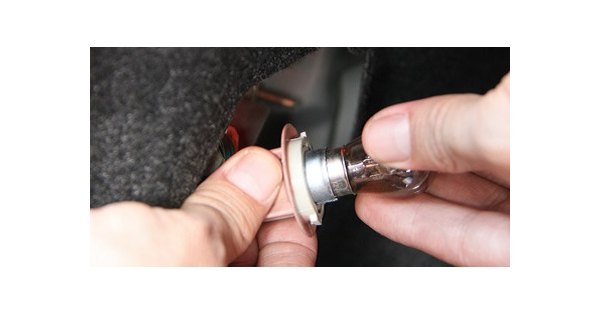
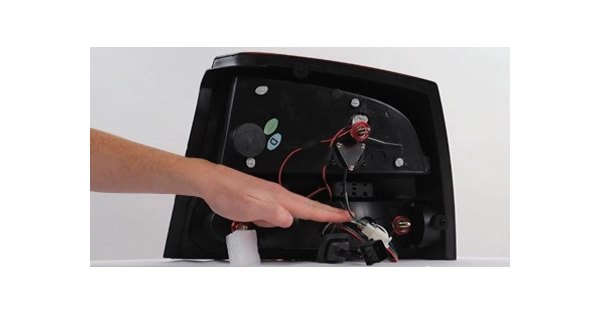
STEP 4. Turn each socket and bulb assembly counterclockwise and pull it out of the lens.
STEP 5. Push the bulb firmly outward in case it is the one with the flat rectangular harness. But if your bulbs have round bases, just pull them in a bit and then turn a quarter turn to release them.
NOTE! If your old tail lights come with a harness that can be separated via a main harness, which leaves part of the harness with the bulbs inside your car's tail lights, you will still require both parts of the harness. The thing is, the aftermarket tail lights are constructed to either reuse the factory bulbs (for Altezza/Euro) or connect straight into the bulb harnesses (for LED tail lights).
STEP 6. Remove the old tail light lenses and put them away in a place where they won't scratch or brake. Install the new set of tail lenses and then screw/bolt them in.
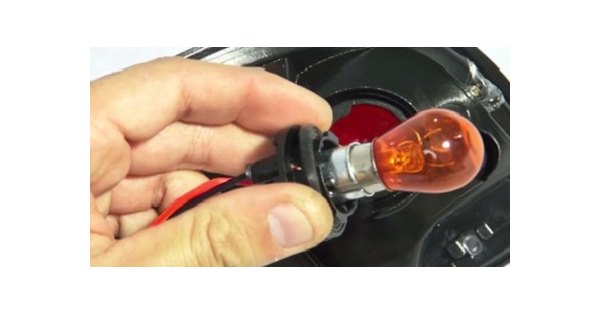
Some factory-installed bulbs, such as reverse lamps, might be reused in your new LED light assembly. For the rest, the LEDs have male plugs that should be absolutely identical to your stock bulbs' ends.
STEP 7. Connect the plugs into your stock harnesses. For plug-in type harnesses, please try to put the plugs in the opposite orientation in case they do not work. Still, most LED tail lights come with the plugs and sockets that are already designed to be simple plug-and-play units. However, if there is any tail light black wire, and red wire to red.
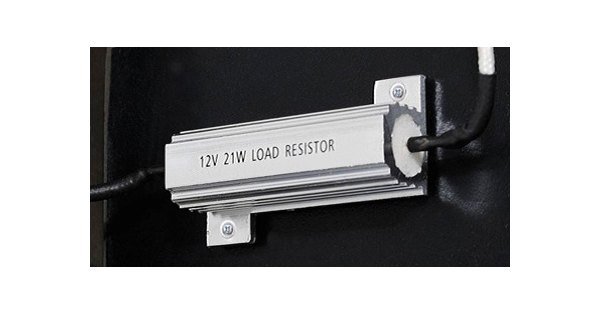
In comparison to your stock tail lights, LED lights function at a lower wattage and include a resistor that regulates the current passing to the lamps. In some cases, this box can be internal, but generally it is external and connected via a plastic plug. By the way, the latter type should be mounted (they usually come with a double-sided tape on the backs) where it will be far from moisture and heat.
STEP 8. Reconnect the battery and test your tail lights before having them completely bolt-on.
NOTE! Make sure everything operates properly, including the brake lights, backup lights, and turn signal lights. If there are any problems and one of them does not work, the first thing you should do is to inspect the connection as it is the most frequent reason for a lamp not lighting up. In case you're installing LED lights and after all the steps listed above have been performed they're still non-functional, try flip ping the plugs over in the reverse orientation and then double check the resistor boxes to be fully connected.
STEP 9. Secure all bolts in place. Install any trim or cover that was previously removed for access.
Caution! Be careful not to tighten every screw completely in while all bolts are tightened to the appropriate degree.
Now you can enjoy your new, highly reliable set of tail lights.
Should I Be Concerned About Condensation Inside My Tail Light Assembly?
The quick answer to this questions is no. Condensation buildup inside a tail light assembly is normal, and it occurs for a number of reasons. First, vents along the top and bottom of the tail light housing are necessary to equalize pressure differences that would otherwise cause the entire assembly to crack and fail. Hot tail light bulbs create high pressures inside the tail lamp assembly, and temperature differences only increase as lens cover surfaces cool from direct airflow contact at speed.
Condensation does not mean that a tail light assembly is defective, and the presence of fogging or misting due to condensation is not considered a valid reason for warranty replacement of the entire tail lamp assembly.

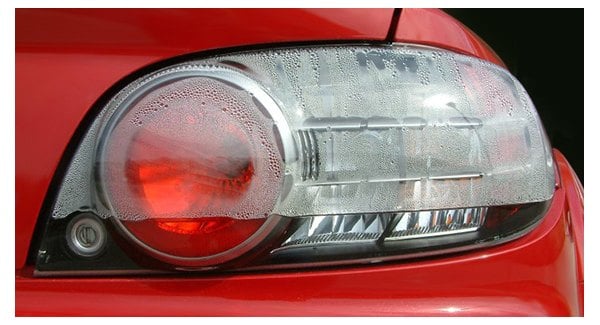
After hot, pressurized air has worked its way out of the fog light through the vents, humidity can get drawn in from the outside. So, fog lights that have been on during hours of driving become fogged on the inside because their cool temperature creates a low-pressure area that actually draws moisture in. This condition is made worse by high outside humidity, and by colder outside temperatures during winter months.
Condensation inside the fog light assembly can also occur in other situations such as a car wash. And it can occur even when fog light bulbs are not turned on. For example, a car that's been driven in the daytime and parked can develop condensation as residual heat leaves the engine and warms the back side of the fog light assembly.
While most condensation in the fog light lens usually dissipates after approximately 20 minutes of driving with the low beams switched on, some small and insignificant areas of the lens may remain misted for a little longer. A normal amount of water condensation inside the fog light assembly will not affect the optical functions of the fog light in any way, and will not cause any parts or wiring to corrode. To minimize condensation buildup inside the fog light, make sure any dust boots or covers are on tightly. Also make sure that the fog light vents are not blocked, which could prevent condensation from escaping.
If water collects inside your fog light to the point where puddles form, odds are you've got a crack in the light lens cover. Water can also leak in because of improper seals around dust boots where bulbs are inserted. If no cracks or holes are visible around the edges of the fog light, the problem could be the housing itself. If you can visibly locate a crack, it's best to repair it with sealant.